Friday, February 24, 2012

DIY Lotus flower headband for only 2$ in less than 10 mins


How to make a Lotus flower headband for 2$ and in less than 10 minutes- Yup it's pretty dang simple!

What you'll need

and some elastic ribbon for the headband- this one was 1$ at Hobby Lobby


Step One
Your felt should be 14 inches by 6 inches 
Next you will fold it in half lengthwise(show above)
then you will be cutting it diagonally starting at 1 inch and working up to 3 inches at the end

Step2

With the fabric still folded in half you will begin cutting out small leaf shapes (shown above) Almost like a triangle but more rounded in the middle and skinnier at the base- 
Your felt should look like the above picture when done an open.

Step 3

Now you will begin making the flower by wrapping the smallest part of the leaves around your finger first, this will be the center of the flower(Remember to keep felt folded in half)- Now hot glue in place at the bottom border leaving the leaves open at the top- Continue rolling and gluing this into a circle

Step 4

Your flower should begin to look like this from the bottom- keep wrapping felt in a circle till you are done

Step 5

Next you will measure your child's head for the correct size you want your headband to be- Don't forget to add an extra inch for where you will be gluing the ends together- Now you will cut the elastic and hot glue the ends together- let the band sit for a minute to cool

Step 6

You'll want to find where you would like your flower to be placed on the headband- Next hot glue that area and wait about 5-7 seconds before applying the flower to the hot glue

Step 7

Hold the flower and band together for about 20 seconds- Wait for it to cool and Your done! Yup it's that simple, You have a beautiful Lotus flower headband for under 2$ and less than 5 minutes!


This is a great idea to use for party favors, kids fun photography, summer dresses, etc.


I hope you enjoyed this tutorial, please feel free to leave a comment and show your love and support- Your feedback is greatly appreciated :) Lotta love xOxO

Saturday, February 4, 2012

1$ Cute Makeup Brush Holders Tutorial


This tutorial is one that is super simple, budget friendly and super cute! Using anything from old jelly jars to empty cans to dollar store containers, you can create some awesome makeup brush holders-

Here's what you'll need


A ruler to measure your cans
Scissors
Decorative Paper (mine were 20 cents each at Hobby Lobby)
Glue and tape if your working with a container that doesn't hold the glue well
Container- Mine were 1$ each from the Dollar Tree
and Rice (optional)

Let's Begin :)


Measure The can from top to bottom and add 2 inches
So if your container is 5 inches then cut your paper at 7 inches


Draw a line from the 2 extra inches across paper horizontally (this is the part that will fold over the top of can- Make sure to draw the line on plain side of paper so the line doesn't show)


Now cut about 1 inch lines from the outside of paper to the line (this will help the paper to fold over the edges of container without looking bulky or sloppy)


Add glue to paper using a brush to spread evenly (make sure to coat the edges very well)


Wrap paper around container, smoothing out any bumps along the way (be sure not to overlap paper on bottom of container, paper should sit flat to the surface)


If your container is bigger wider than your paper like mine, you will need to cut a strip the same length an add an extra 1/2 inch to be sure you cover the gap


Fold edges into container


Add glue using brush, then fold over again- this will insure a nice/clean rim


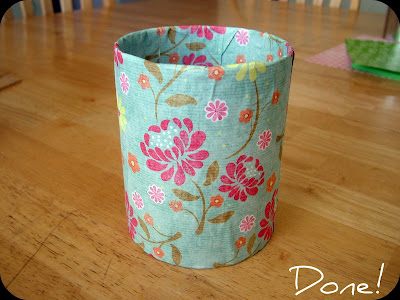
Voila- Your done!

Now if your like me and don't like your brushes falling all over one another, you might want to fill your container with rice- I added 2 plastic bags before filling up the container so I didn't have to use so much rice.


Here's one using an old Cetaphil container


If you like you can add a label :)


an this here^^ is My new Makeup Brush Holder set :)

P.S If you bought the containers from the dollar store- Don't throw those lids out just yet- here's what I used mine for:

Got any box-less lashes wandering around? I know I do- I used some scotch tape and un-stuck it a bit by sticking it to my arm an then taped it sticky side up to the lid- Yup it's that easy :)


Or You can use the lid to organize all those tiny pigments that seem to just fall over or get lost in an ocean of cosmetics :)


I hope you all enjoyed this crafty tutorial- Please leave a Comment to show Your love- I would love to hear from you xOx0