Sunday, February 24, 2013

Yum yum Ground Turkey Chili Beans

Yum Yum Super Delicious Turkey Chili Beans


I made this Ground Turkey recipe the other day cause I've been trying to eat healthier and started slowly eliminating red meat out of my diet. After I made this I couldn't believe how great it turned out. Seeing as how I am def NOT a fan of ground turkey- But to my surprise, it actually came out better than my ground hamburger recipe- Which was an awesome surprise! My family and friends loved it so much that I wanted to share it with you any your families- I hope u all love it as much as mine do :)


Ingredients

1 1/2 lbs Italian Seasoned ground turkey
2 tbls olive oil 
1/2 red onion chopped

2 tbls Fiesta or Fernandez New Mexico chili powder
1 1/2 table spoons minced garlic

1 can 16 ounce can of kidney beans, drained and rinsed
1 can 15.5 oz Bush's Best white kidney cannellini beans drained and rinsed
2 cups water
1 tsp garlic powder
3 tsp cayenne pepper
1/3 can crushed tomatoes
1/2 packet low sodium McCormick chili (for chili beans)
1 tsp paprika
1 tsp dried oregano
Salt and pepper to taste

Cooking Instructions:
-In a large pot on medium heat -heat up oil, then add ground turkey, and red onions- until almost browned

-Next add in the 2 tbls Fiesta or Fernandez New Mexico chili powder,
1 1/2 table spoons minced garlic, salt and pepper (to taste) and continue cooking meat till browned.

-Reduce heat to low and water, Mix in water, kidney beans, garlic powder, cayenne pepper, crushed tomatoes, 1/2 McCormick chili packet, paprika, oregano, salt and pepper to taste. 

let simmer for 45 minutes to marinate all these delicious flavors together.

-Add low fat sour cream, chopped green onions or shredded cheese for added flavor and enjoy :)

If you try this recipe or have any question please feel free to comment.
I absolutely Luuuuuh comments! haha Have a good day/night y'all- Now go make beautiful delicious things <3


heat up oil and ground turkey

Friday, February 24, 2012

DIY Lotus flower headband for only 2$ in less than 10 mins


How to make a Lotus flower headband for 2$ and in less than 10 minutes- Yup it's pretty dang simple!

What you'll need

and some elastic ribbon for the headband- this one was 1$ at Hobby Lobby


Step One
Your felt should be 14 inches by 6 inches 
Next you will fold it in half lengthwise(show above)
then you will be cutting it diagonally starting at 1 inch and working up to 3 inches at the end

Step2

With the fabric still folded in half you will begin cutting out small leaf shapes (shown above) Almost like a triangle but more rounded in the middle and skinnier at the base- 
Your felt should look like the above picture when done an open.

Step 3

Now you will begin making the flower by wrapping the smallest part of the leaves around your finger first, this will be the center of the flower(Remember to keep felt folded in half)- Now hot glue in place at the bottom border leaving the leaves open at the top- Continue rolling and gluing this into a circle

Step 4

Your flower should begin to look like this from the bottom- keep wrapping felt in a circle till you are done

Step 5

Next you will measure your child's head for the correct size you want your headband to be- Don't forget to add an extra inch for where you will be gluing the ends together- Now you will cut the elastic and hot glue the ends together- let the band sit for a minute to cool

Step 6

You'll want to find where you would like your flower to be placed on the headband- Next hot glue that area and wait about 5-7 seconds before applying the flower to the hot glue

Step 7

Hold the flower and band together for about 20 seconds- Wait for it to cool and Your done! Yup it's that simple, You have a beautiful Lotus flower headband for under 2$ and less than 5 minutes!


This is a great idea to use for party favors, kids fun photography, summer dresses, etc.


I hope you enjoyed this tutorial, please feel free to leave a comment and show your love and support- Your feedback is greatly appreciated :) Lotta love xOxO

Saturday, February 4, 2012

1$ Cute Makeup Brush Holders Tutorial


This tutorial is one that is super simple, budget friendly and super cute! Using anything from old jelly jars to empty cans to dollar store containers, you can create some awesome makeup brush holders-

Here's what you'll need


A ruler to measure your cans
Scissors
Decorative Paper (mine were 20 cents each at Hobby Lobby)
Glue and tape if your working with a container that doesn't hold the glue well
Container- Mine were 1$ each from the Dollar Tree
and Rice (optional)

Let's Begin :)


Measure The can from top to bottom and add 2 inches
So if your container is 5 inches then cut your paper at 7 inches


Draw a line from the 2 extra inches across paper horizontally (this is the part that will fold over the top of can- Make sure to draw the line on plain side of paper so the line doesn't show)


Now cut about 1 inch lines from the outside of paper to the line (this will help the paper to fold over the edges of container without looking bulky or sloppy)


Add glue to paper using a brush to spread evenly (make sure to coat the edges very well)


Wrap paper around container, smoothing out any bumps along the way (be sure not to overlap paper on bottom of container, paper should sit flat to the surface)


If your container is bigger wider than your paper like mine, you will need to cut a strip the same length an add an extra 1/2 inch to be sure you cover the gap


Fold edges into container


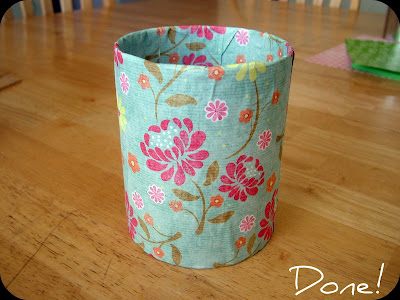
Add glue using brush, then fold over again- this will insure a nice/clean rim


Voila- Your done!

Now if your like me and don't like your brushes falling all over one another, you might want to fill your container with rice- I added 2 plastic bags before filling up the container so I didn't have to use so much rice.


Here's one using an old Cetaphil container


If you like you can add a label :)


an this here^^ is My new Makeup Brush Holder set :)

P.S If you bought the containers from the dollar store- Don't throw those lids out just yet- here's what I used mine for:

Got any box-less lashes wandering around? I know I do- I used some scotch tape and un-stuck it a bit by sticking it to my arm an then taped it sticky side up to the lid- Yup it's that easy :)


Or You can use the lid to organize all those tiny pigments that seem to just fall over or get lost in an ocean of cosmetics :)


I hope you all enjoyed this crafty tutorial- Please leave a Comment to show Your love- I would love to hear from you xOx0

Monday, January 9, 2012

How to give an old favorite t-shirt love again


What You'll Need:
T-shirt
Scissors


Step 1: Straighten out t-shirt
Step 2: Cut off collar just below hem line
Step 3: Cut shirt in half (about 5 inches below underarm)
Step 4: Now go around the rim of neck line again this time cutting off about an inch thick, Now starting from the neck line about 3 inches out cut a line from the shoulder to about 2 inches under the underarm- Now fold the shirt in half an cut following the already cut side of the shirt to ensure an even cut on both sides, It should look like the picture above afterwards, an Voila Your done- Now go sport your new tee! :)
-I like to wear a tank top under mine :)

Wednesday, March 16, 2011

Easy Cheesy Pizza for the kiddos


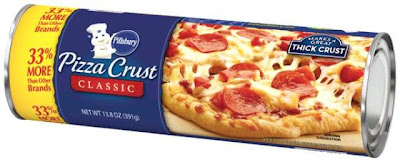
I thought I would write a review/recipe kinda thing for some pizza dough I tried for dinner tonight- I used for the first time ever Pillsbury Pizza Crust Classic and I must say, the kiddos loved it- My house smelled something like a school cafeteria and I mean that in a good way- I dunno where u grew up or if you enjoyed the smell of freshly baking lasagna or pizza from the cafeteria- but as for me I loved it <3 and so I was very pleased when the pizza had been cooking for about 10 minutes and then came thee aroma haha : ) 

Simple Pizza instructions : )

First Preheat your oven to 425' Take your Pillsbury Pizza Crust Classic dough- I used 2 containers

and Grease a 12x16 inch pan, then take your dough and use one container for each half of the pan (shown below) Spread with fingertips evenly (I left mine thicker maybe about 1/4-1/2 inch thick


Then spread your sauce- I used a basil flavored red sauce Cause it's kinda sweet and smells delicious : D -I used about 1- to 1 1/2 cups for the whole pizza then I sprinkled the whole thing with garlic powder Mmmm Gotta love garlic : D


Then add your cheese- I used about 1 1/2 cups of Fiesta cheese, 3 slices of Kraft cheese cut into triangles ( cause it looks cute and the kids loved that flavor best: ) and about 1 cup of shredded Parmesan cheese from the bag- Don't forget to spread evenly-


Then you can add whatever other toppings you an your kiddos like, (I just went with pepperoni because that is the ultimate kids pizza and a sure to please topping haha) but I wouldn't use too many toppings on the pizza because it might take too long too cook and then the crust might cook unevenly?

-Then bake it at 425'  for 13-17 mins > Mine took only 14 minutes, but it really just depends on how fast your oven heats up etc.

And that's about it, it was as simple as 123 LOL- but it was delicious and because I have toddlers I cut the pizza into sticks about 2- 2 1/2 inches thick and 5 inches long- I hope you and your family enjoy this simple yet yummy pizza as much as mine did 
bon appetit : D


This pizza looks especially cute served on bright plates with salad and fruit <3


Wednesday, February 16, 2011

My Kinda Purse-onality :)

What you'll need: 
>Fabric Ribbon (black)
>Navy Blue Buttons
>Needle and black thread
>Scissors
>Heat N Bond (spray bottle with water and Iron)
>Kinda plain Purse


 I got this purse from Walmart for 9.00 on clearance- Reg:12.00
And wanted to show those of you who are creative great bargainers how you can create a truly cute/unique style purse on a budget 
: ) (but even if you are not on a budget it always feels nice to save money) 


 I bought some very inexpensive Fabric ribbon for 1.98 
Measure your fabric ribbon to your purse, side to side, leaving 1/4 inch on each side for a clean tucked edge.  
Find your desired placement and line the back with: Heat N Bond
[Heat N Bond is Ultra hold Iron-On adheisve is a paper backled sheet of solid heat activated adhesive. It uses a low temperature & short pressing time so it allows for a wider range of materials that can be bonded. Use with fabric, foil, lame, denim, felt, suede, leather, wood and cardboard. Machine washable. There is no steam or pressing cloth needed. It will not lift or pucker after washing. It's no-sew bond is three times stronger than any other traditional fusible web. and is about 1.50 in stores]


Measure it to your purse, folding the ends underneath and follow Heat N bond Instructions


Next Iron on as directed...


Take your buttons, (I chose a dark blue I got from Walmart for 1.48)establish where you would like the buttons to be placed- 
Now get your needle and thread ready for some quick hand sewing, I chose to lay them side by side vertically but you can place them wherever you like : )


Next sew your buttons in place starting from the inside-out to hide the knot


Now the last easy step is to just take your same needle and thread and sew the ends of your fabric stripes inward(just to assure a really tight hold)


And now you are finished-


Enjoy your purse and wear it with style- it's all your own : )
I love this one <3

Thursday, February 10, 2011

Super Cute freezer bag art Tee

What you will need:
>Freezer bag paper
>X-acto Knife
>Fabric paint (color of your choice)
>Iron
>Scissors
>Pen
>Sponge
>T-shirt
Take your plain t-shirt(pocket free)-(I bought mine from Walmart they were 4 for 7$)
 Cut the tips of the sleeves off (just to the desired length) and trim off collar -kind of at an angle (for this will be a one sided shoulder revealing style shirt) You may want to put on the shirt and then mark where you want the shoulder to fall before cutting. (Remember: you can always take more off, but putting it back on is not so simple)
Take your freezer paper and draw what you want on your shirt (matte side of the freezer paper UP- Glossy side DOWN)


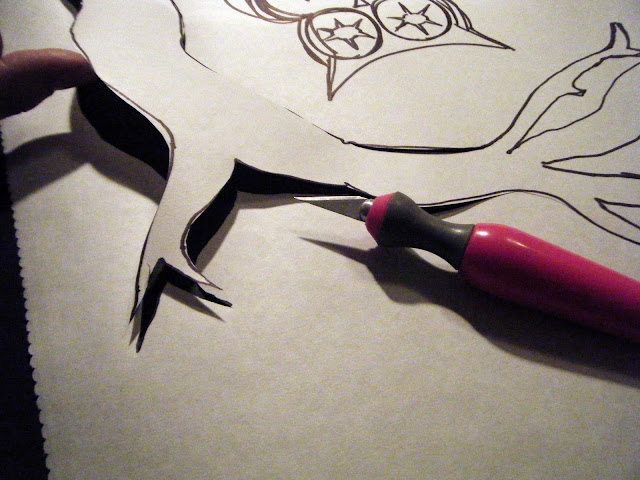
when you are finished you will need to take your X-acto knife and cut out your design (keep in mind that you will be blotting this design with paint so the only part of the design that will show, is the empty areas- Try to think of your stencil the middle part as the wrapper and the outside of the stencil is your desired candy :)
(you might want to place something under the paper so you don't cut up your table, floor etc)


When you are done,find your desired placement for your design on your t-shirt and iron -matte side up- paper onto your shirt with a low setting and(steam free) for about 30 secs
When you are finished the paper should be flat to the shirt without any lifting areas.
Take your paint(color of choice)& sponge an blot over the open areas of your design till coated evenly (you may want to put a piece of cardboard in between the inside of the shirt to avoid getting paint on the other side of your t-shirt)
When paint is near dry or completely dry, peel off freezer paper to reveal your awesome new Tee and design- 
Yup No joke, you are done! : D Now wear it with style- after all you made it, and what's cooler then that?! Really!